Once you figure out the basics, fly tying is a relatively easy and simple process. However, before you can get started, you may want to get a fly tying kit. These kits are designed for both beginners as well as experienced tiers, and each one comes with a large selection of tools to help you tie a particular pattern. For beginners, fly tying kits often give their users several instructions for the fly as well as the tools included in their kit.
Although handling the average fly tying kit is easy, handling the actual fly requires quite a bit of experience. In this sense, the kit is a lot like fly fishing itself. It’s difficult to figure out at first, but it gets easier as you figure things out along the way.
So whether you’re getting a fly tying kit for your own personal use or giving it to a friend as a gift, it’s best to choose one that has an easy rating. This way, you will have fewer problems figuring out the instructions on how to tie your flies.
What Items Should A Fly Tying Kit Include?
Fly tying kits can contain anything you like. There’s no stopping you from adding whatever you feel is necessary to make your work easier. However, you should also remember that your kit is there to keep all your tools organized. So even though you can include anything you like in your kit, it’s also a good idea to take some pointers from the kits used by professional fly fishers.

On the other hand, if you don’t have a lot of experience with fly fishing or tying flies, it’s best to buy a prepackaged fly tying kit rather than create one on your own. With that in mind, a good fly tying kit should include the following items in order to be truly effective:
- Several bobbins
- A couple of scissors
- A vise
- A couple of hackle pliers
- A full set of hackle guards
- A bobbin threader
- A whip finisher
- A hair stacker and bodkin
- Several pieces of hooks (Try to include the following types for variety: Streamer, Scud, Nymph and Eagle Claw)
- A hackle
- Dubbing
- Pheasant tail feathers
- Several types of threads
- Ribbing wire
- Deer or Moose body hair
- Gold or silver tinsel
That’s a lot of items for a single kit, but this is meant to give you a general understanding of what the average fly tying kit should include. Remember that aside from the kit itself, there are also different brands of kits and items to choose from.
So before you start looking at which type of kits to buy, you might also want to look at different brands of items, just to give you some basis for comparison. For example, if you’re looking for a good vise, you may want to look at its particular brand and then compare it to other brands, along with the different types of vise that they have to offer.
How to Use a Fly Tying Kit
Assuming you have a reliable fly tying kit, and that you have bought all the necessary items and supplies, fly tying can be performed in five simple steps.
1.
First of all, simply open your kit in order to begin organizing all the different tools on an empty table.
Begin by attaching the vice onto to the base of the table using a C clamp. You can then either position the vice in such a way that you can easily reach it from the comfort of your chair, or you can clamp it onto the edge of the table using the C clamp.
2.
Next, get the spool of thread along with a bobbin and loop style threader from your kit. A bobbin will have a couple of post included/attached to its tube. The first thing that you will need to do is to insert the loop threader right through the upper side of your bobbin loop.
This may seem a little complicated at first, so take you time, and relax. Once you’ve pulled back the loop, you can then start threading the bobbin, and don’t forget to put one bobbin post on both ends of your thread spool to keep everything secured.
3.
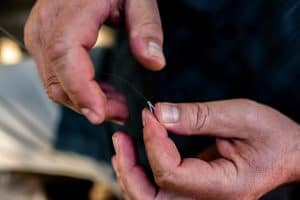
The third step in using a fly tying kit involves the hooks. Before you get started, however, be sure to adjust the vice’s tension and turn it to the loose setting. You can do this by simply turning the knob of the vise which can be found near its jaw.
Once you’ve done that, place the hook in the vise and then tighten the jaws. You can also make sure that the hook is secure by putting a certain amount of pressure onto the hook shank.
4.
In the fourth step, you will need to read the instructions about the fly that you want to use. These are usually included in the kit, so you won’t have to look far. Also, don’t forget to observe some of the illustrations and pictures as they are often more useful than the actual instructions.
For example, fine hackles are usually designed for dry flies, whereas fur is used dubbing. By looking at illustrations, you will be able to figure out how to handle the fly tying process for each type
5.
Finally, you will need to follow each step on the instruction manual. In most cases, you will be required to begin the thread by creating different wraps.
You can also expect to secure different types of materials onto the hook in order to securely tie the fly. As you use the fly tying kit, you should also keep a close eye on the portion of each material used for tying fly.
Conclusion
People who have no experience with fly tying kits often end up using too much of each material, and they end up crowding the head of their fly. Figuring these things out may be a bit of a challenge, but they can help you understand what you need to do, and this is what matters.
Later on, once you’ve figured out the basics, you’ll be able to develop and apply some of your own techniques in fly tying.